I required a multiple hop environment for a Networking course I was taking at NCSU in my final semester of my Masters program. The goal of the project was to simulate Go-Back-N protocol and to do this we were required to transfer a file in bytes across the internet. You can read more about that project here.
Essentially, I needed to be in two physical places at once. I was accustomed to being able to use my LAN for the majority of my projects and never really needed to transfer a a file across the internet in this manner previously.
Generally, each of your Python projects will use the same directories and libraries by default. An issue comes into play when you have projects that are using different versions of Python. Virtual environments are paramount to keep dependencies required by different versions of projects separated.
In this project we will:
- Create a user, download credentials, and set up the AWS CLI
- Create an Ubuntu 20.04 Ec2 instance (t2. micro)
- Connect and log in to the instance using a keypair
- Refresh updates and upgrade all packages on the instance
- Create a directory called “environment” and create a virtual python environment in that directory.
- Activate that virtual environment and confirm the environment is up
- Create a program called hello.py
- print “Hello, World!” in that file
- Run the program
IAM User
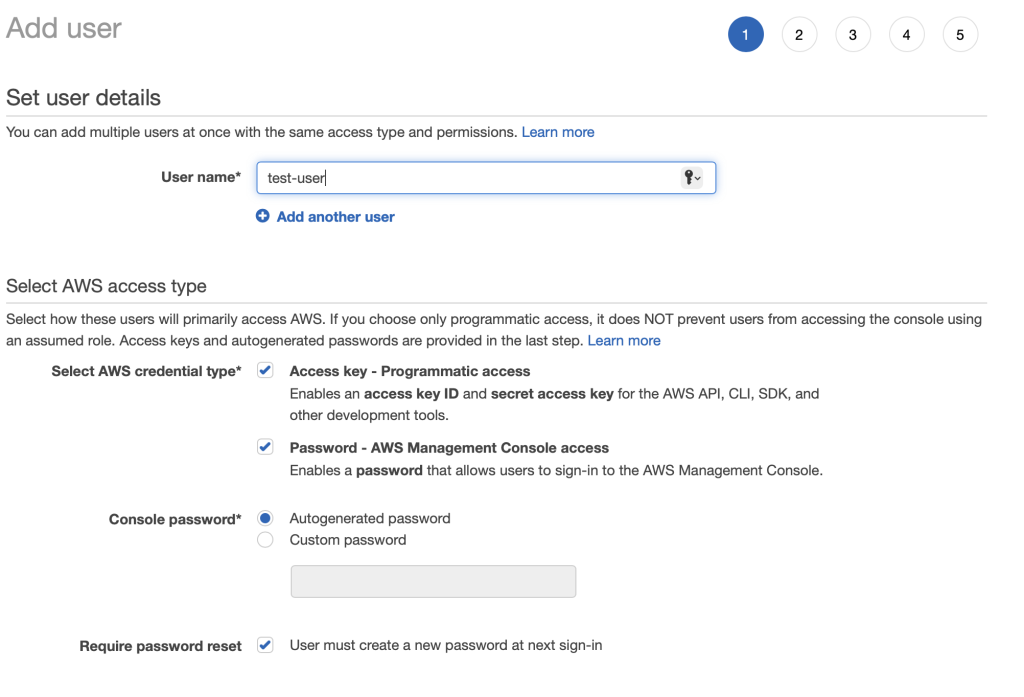
For this project, we will need a user with programmatic and console access.
- Navigate to IAM.
- Click Users.
- Click Add user.
- For Add user page:
- User name: Create a User name
- Access type: Select Programmatic access and AWS Management Console access
- Console password: Select auto-generated
- Require password reset: uncheck User must create a new password at next sign-in
5. Click Next for permissions.
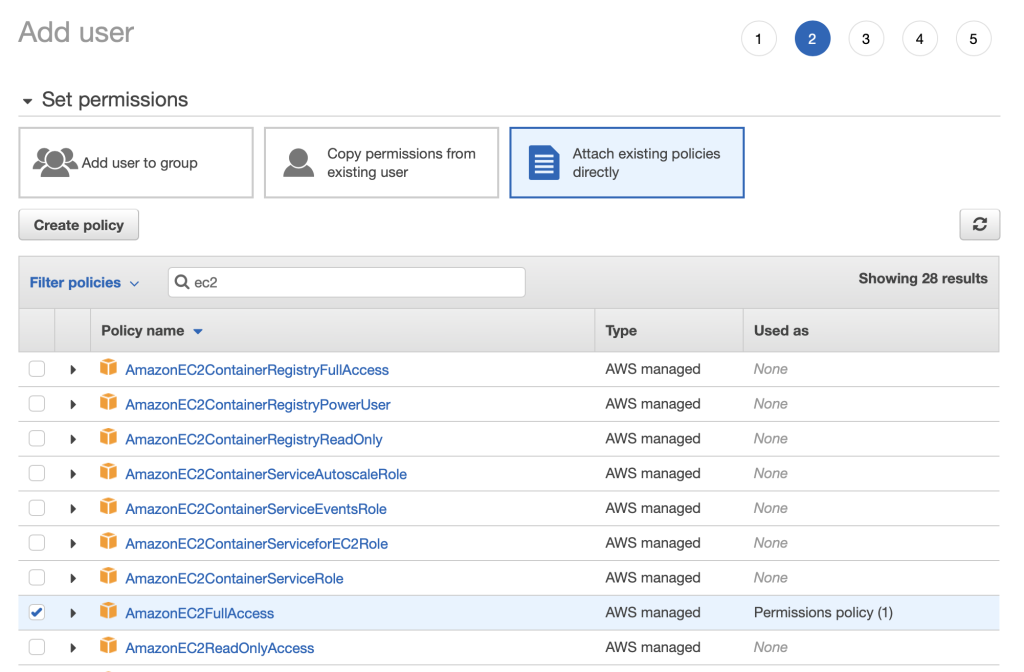
6. Search ec2 and add AmazonEC2FullAccess policy. Click Next.
7. We won’t be adding any tags. Click Next.
8. Click Create user.
9. We will need our Access key ID and Secret access key later so click the Download .csv button.
Installing AWS CLI
I’m using a MacOS, but you can do a quick Google search for the AWS CLI Install if you are using something different.
- Install PIP. (if necessary)
python3 -m ensurepip2. Install AWS CLI. (If necessary)
python3 -m pip install awscli --upgrade --user3. Verify AWS CLI install.
aws --version4. Configure AWS CLI. (If necessary)
aws configure5. Reference the .csv file downloaded when we created our new user. (Note: This will make your AWS CLI User utilize these credentials for all CLI operations. If you already have AWS CLI established you most likely have an Administrator Policy attached to your current user.)
- For AWS Access Key ID enter the your Access Key ID then push Enter
- For AWS Secret Access Key enter your Secret Access Key then push Enter
- For Default region name enter us-east-1 then push Enter
- Leave Default output format blank then push Enter
6. If there are no outputs then assume there are no issues with setting up the AWS CLI configuration.
Create Key Pair
- Run the following command to create a key pair named pythonkp.
aws ec2 create-key-pair --key-name pythonkp --query "KeyMaterial" --output text > pythonkp.pem2. Use nano or another text editor to verify pythonkp.pem contains your private key.
nano pythonkp.pem3. To ensure your key is not publicly viewable run the following.
chmod 400 pythonkp.pemCreate Security Group
We will need a Security Group for our instance that will allow SSH from 0.0.0.0/0 so we can access our site. This is not necessarily best practice so feel free to restrict SSH to only your IP. A quick online search will provide you with this information.
- Run the following command to create the Security Group named SG-WebDMZ.
aws ec2 create-security-group --group-name SG-WebDMZ --description "SG-WebDMZ"2. Take note of the GroupId because we will need it in the next step and in later steps.

3. Run the following command to update the inbound rules for the Security Group. Be sure to substitute <GroupID> for the GroupId from the last step.
aws ec2 authorize-security-group-ingress --group-id <SecurityGroupID> --protocol tcp --port 22 --cidr 0.0.0.0/0Create EC2
- Run the below command to create an EC2 instance with the following attributes:
- Image-id: ami-09e67e426f25ce0d7 (Ubuntu Server 20.04 LTS)
- Count: 1
- Tags: Key: Name, Value: MyInstance
- SecurityGroup: SG-WebServer
Remember to replace <SecurityGroupId> with your Security Group Id.
aws ec2 run-instances --image-id ami-09e67e426f25ce0d7 --count 1 --instance-type t2.micro --tag-specifications 'ResourceType=instance, Tags=[{ Key=Name,Value=MyInstance}]' --security-group-ids <SecurityGroupId> --key-name pythonkp2. After successfully running the run-instances command, the output will be a JSON template with your new instance information. Look through the output to verify the Key Name is correct and that the Security Group was attached.
3. To confirm that our EC2 instance was created we will list our instances filtering by our Tag.
aws ec2 describe-instances --filters "Name=tag:Name,Values=MyInstance" --query "Reservations[].Instances[].InstanceId"4. You should see a similar output.

Allow Network traffic into the instance
If you plan on sending traffic to the instance you will need to open some ports. As a default, port 22 is open for inbound traffic and all else are closed. Outbound traffic is unrestricted.
- Navigate to your EC2 Dashboard
- Select Network & Security > Security Groups on the left hand panel
- Select the SG-WebDMZ created previously
- Edit inbound Rules to allow any ports required for your project.
SSH Into Our Ubuntu Instance
- Run the below command to find the Public IP of our instance. Replace <Instance Id> for your Instance Id.
aws ec2 describe-instances --instance-ids <instance id> --query 'Reservations[*].Instances[*].PublicIpAddress' --output text2. Run the following to SSH into our Ubuntu instance using our pythonkp.pem.
ssh -i "pythonkp.pem" ubuntu@<public ip>3. Type ‘Yes’ and press enter.
4. You should now see that your has updated to ubuntu@<private ip>.
Install Python
- Run the following to update packages on your Ubuntu instance.
sudo apt update2. Next run:
sudo apt -y upgrade3. Now check the python3 version to see if it was installed
python3 --version4. Install pip, which will install and manage programming packages we will use for development.
sudo apt install -y python3-pip5. Next we will install some packages and development tools. (reboot may be required)
sudo apt install -y build-essential libssl-dev libffi-dev python3-dev- Install venv.
Create Virtual Environment
sudo apt install -y python3-venv2. Make a directory for your virtual environment.
mkdir environment3. Change into the environment directory.
cd environment4. Create the virtual environment.
python3 -m venv my_env5. List the newly created my_env directory to see the contents.
ls my_env
6. Activate our virtual environment.
source my_env/bin/activateNotice that the prefix now included (my_env). This lets you know that the environment is active.

Run A Python File
- Let’s create a simple “Hello, World!” print function.
vim hello.py2. Press i on your keyboard to enter insert mode and type the following:
print("Hello, World!")3. Press the Esc key to take you out of insert mode, then type :wq to save and return to the terminal.
4. Type the following command in the terminal.
python hello.py5. You should see the words “Hello, World!” printed on the screen.

Clean Up
- Delete our Ubuntu instance.
aws ec2 terminate-instances --instance-ids "<Instance Id>"2. Delete the key pair if you don’t have any more use for it.
aws ec2 delete-key-pair --key-name pythonkp3. Delete the Security Group if you don’t have any more use for it.
aws ec2 delete-security-group --group-id <GroupId>4. Delete our test_user. For this, you can use the CLI, but you will have to update the AWS Configure to use an administrator with IAM privileges. I just took the easy route and deleted it from the AWS Console. Below is the command if you want to use the CLI.
aws iam delete-user --user-name test_userThat’s it. Hope you found this article useful and thank you for reading.